Getting started with Elvie Stride 2
How to disinfect Elvie Stride 2 before use
Elvie Stride 2 is not provided sterile. This means it must be cleaned and disinfected before first use.
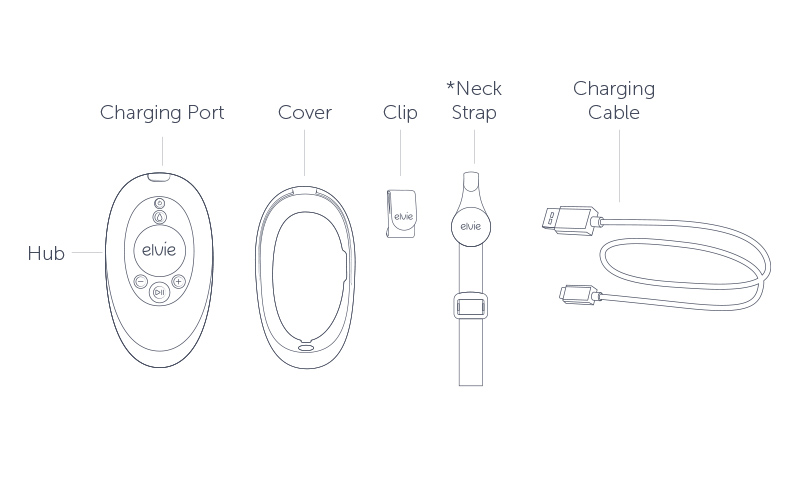
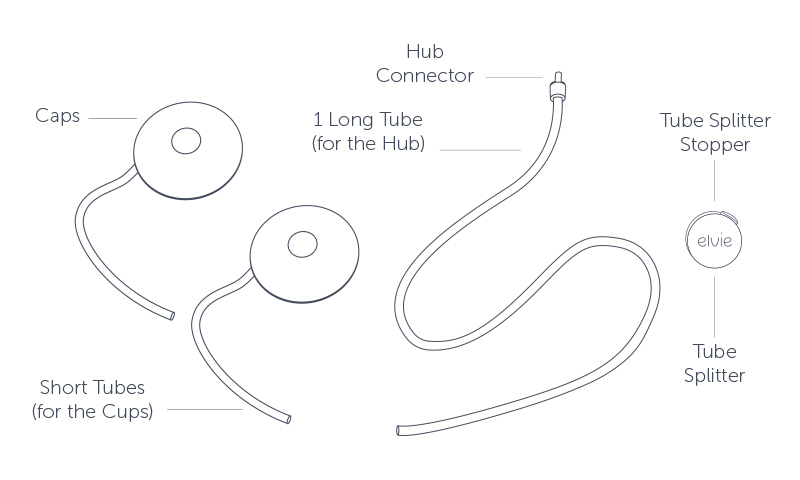
Before cleaning and disinfecting your Elvie Stride 2, put the following parts to one side. They are non-washable and should be kept dry. They can be wiped clean with a damp cloth, but not submerged in water. They must not be microwaved.
To clean and disinfect your pump:
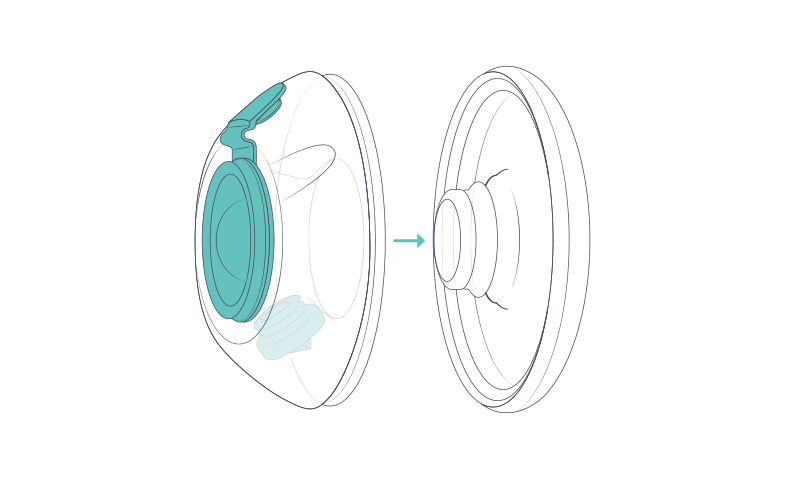
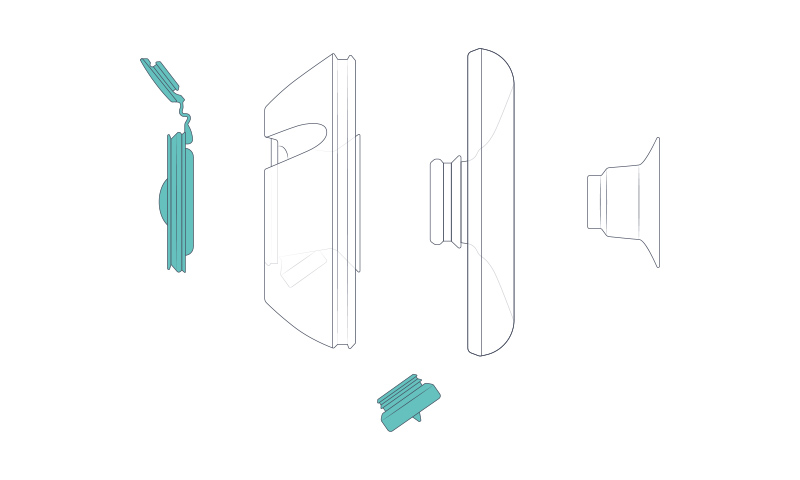
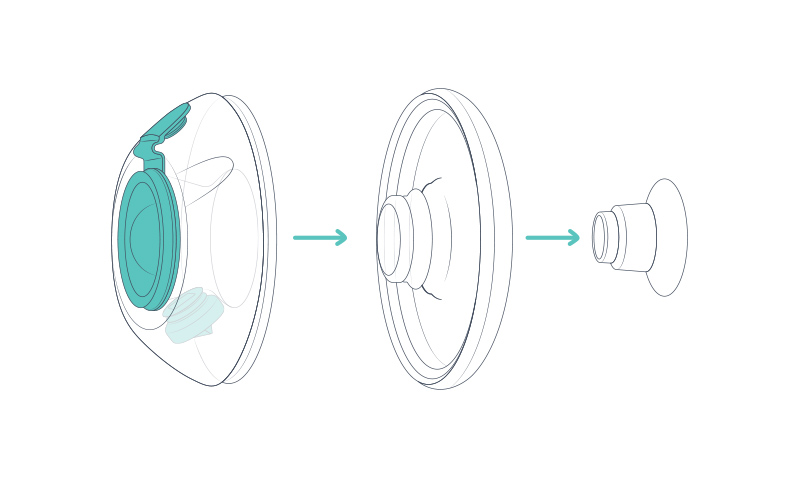
1. Start by taking the cup apart.
2. Pull the cup front away from the breast shield.
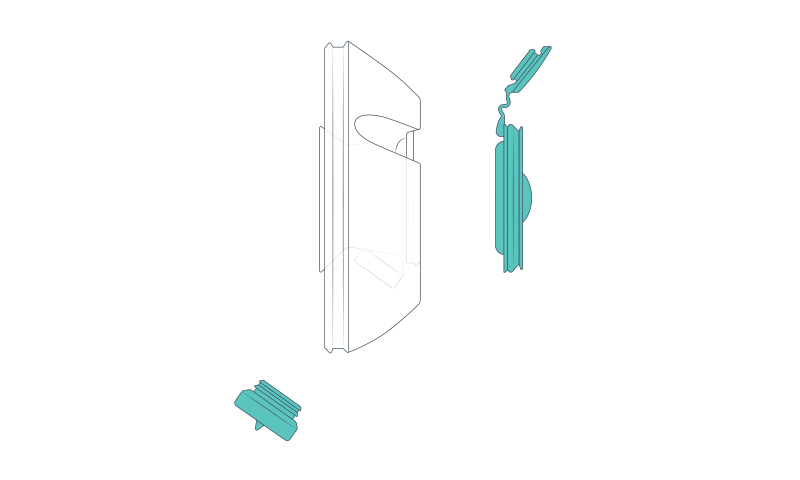
3. Pull the valve out of the breast shield and then remove the diaphragm and stopper.
4. Clean and disinfect the following parts:
You need to clean these parts before first use and after every use:
Either:
Rinse in cold, clear water.
Washing in warm water using mild dish soap.
Rinsing with cold, clear water for 10 to 15 seconds.
Or:
Rinse with cold clear water for 10 to 15 seconds.
Place on the top shelf of the dishwasher.
Do not place the parts directly in the kitchen sink for rinsing and washing. Use a dedicated wash basin or alternatively they can be put on the top shelf of the dishwasher.
5. You will then need to disinfect these parts before first use and at least once daily. You can do this by either:
Using cold water disinfection methods.
Putting them in boiling water for five minutes.
Do not use microwave or steam disinfection methods.
6. Before assembling your pump, make sure all the components are dry. Do not store wet or damp parts, as mold may develop.
For additional cleaning guidelines, please see the Centers for Disease Control and Prevention website.
How to assemble Elvie Stride 2
Before you assemble your pump, make sure that the relevant parts have been cleaned and disinfected as per the instructions above.
Wash your hands thoroughly with soap and water before touching Elvie Stride 2 and its components. You should avoid touching the inside of the cup front and breast shield.
To assemble your pump:
1. Start by making sure that all the parts are completely dry, especially the Diaphragm and Stopper.
2. Push the hub connector firmly into the hub, making sure that it is fully inserted.

3. Push the valve into the cup front. Once you’ve pushed the valve in, take care not to twist it or move it. Milk can pool in the nipple tunnel if the valve is twisted.
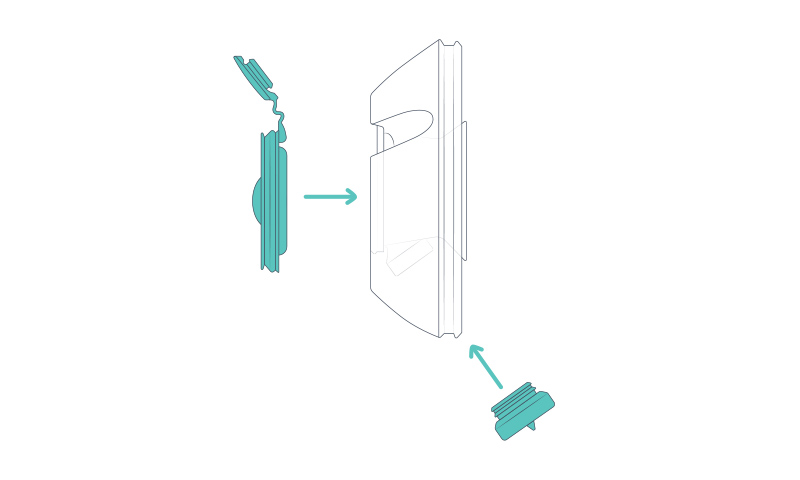
4. Use your fingers to work the diaphragm rim over the cup front. Take a moment to check the diaphragm is sitting flush and is on securely. Close the stopper.

5. Fit the Breast Shield over the Cup Front. Ensure it’s sealed tightly all the way around and there are no gaps. The Cup Front should be fully covered by the lip of the Breast Shield. You can also use a Nipple Insert here if needed.
6. Check that the Diaphragm is completely dry as moisture can be sucked into the Hub. This affects the performance of your pump.
7. Push the Cap over the Diaphragm onto the Cup Front, ensuring that the tube is aligned with either the left or right channel.
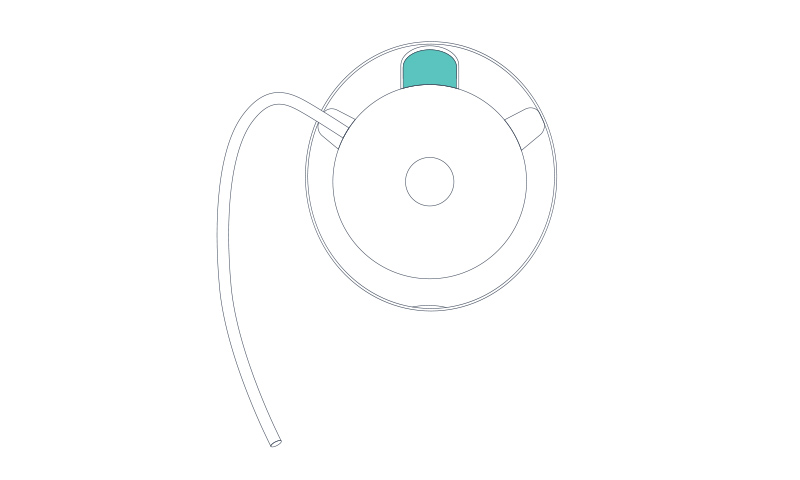
8. Attach the Hub to your clothing using the clip.
How to charge Elvie Stride 2
When charging your Elvie Stride 2, you should only use the charging cable provided in the box.
To charge your Elvie Stride 2:
Connect the charging cable to a USB power source. It is best paired with a charging adapter of maximum output 5 V / 2.1 A or 10 W.
Plug the charging cable into the hub.
Leave the hub to charge (once the hub is fully charged, the light will change from amber to green).
When charging your pump, please keep in mind that:
It takes approximately two hours to fully charge Elvie Stride 2, depending on your charging setup.
A full charge lasts for approximately five 30-minute pumping sessions (depending on what settings you use).
Elvie Stride 2 will not switch on while it’s charging.
A red light means low battery and green means fully charged. Amber means your pump is charging.
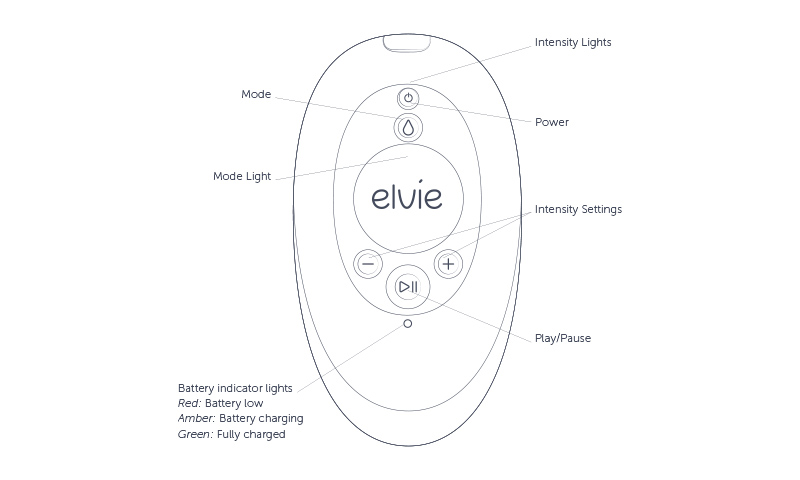
If you want to check how much charge is left, press the ‘Mode’ button when the pump is switched off or charging.
The intensity lights will show you how much charge is left. Each light indicates 10% charge. For example, five lights means that the pump has 50% charge.
Before you use your pump, we recommend closing the charging port. This will make the hub as discreet as possible.
If you already have a charging adapter at home, we recommend checking for the following:
The output voltage / current or power is in the range stated above.
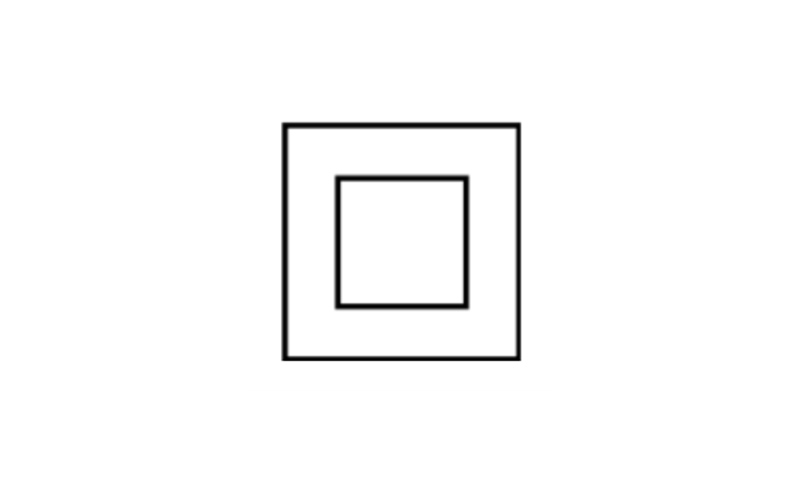
The charging adapter contains a country-specific standards mark, such as one of the below.

The charging adapter is double insulated (Class 2 electrical certification).
How to select your Nipple Insert size
The breast shield and nipple insert creates a seal between your nipple and your pump, so the fit is very important.
Every pump comes with a 28mm breast shield attached to each cup. There are also 24mm, 21mm, 19mm, 17mm and 15 mm Nipple Inserts included in the box.
To check which size you need, use the Nipple Sizing Tool in the box:
1. Ensure your nipple is erect before measuring.
2. Place your erect nipple in a hole that leaves a ~1mm gap around your nipple.The number on the tool indicates which insert you should use.
3. You will need to repeat this process separately for each of your nipples.
4. You might find that your nipple could fit two different sizes, if that’s the case, it’s a good idea to try pumping with each size to see which one works best for you.

If you need help determining the correct size, please get in touch with our Customer Care Team.
How to put Elvie Stride 2 on
Before you start, please make sure you have cleaned, disinfected and assembled your Elvie Stride 2 as per the above instructions.
You will also need to ensure that you’re using a breast shield size that works for you (see ‘How to choose your nipple insert size’).
Before putting Elvie Stride 2 on, wash your hands thoroughly with soap and water before touching the pump, its components, or your breasts. You should avoid touching the inside of the cup front and breast shield.
To put Elvie Stride 2 on:
1. Put one of your hands under one of your breasts and bend forwards.
2. Bring the cup to your breast, paying attention to the direction of your nipple.
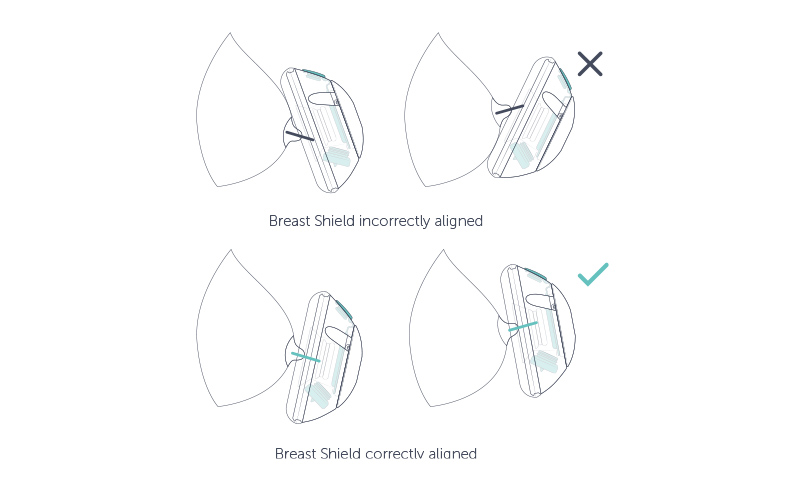
3. Make sure that your nipple isn’t touching the side of the tunnel and that the tip isn’t obstructed.
4. Straighten your back while holding the cup in place and use your bra to secure your breast and the cup. Check the cup is firmly pressed against your breast.
5. If you have a second cup, repeat this process on your other breast.
6. Check that the tubes are not kinked or pinched flat.
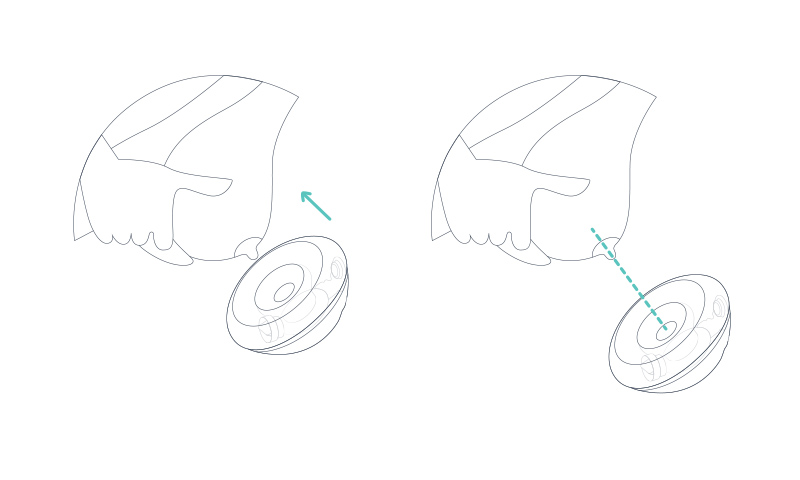
7. Make sure the hub connector is plugged into the hub.
8. If you want to attach the hub to your clothes, you can use the cover and clip to do this.
How to align your nipple correctly
Getting good nipple alignment is really important. It’s a key part of ensuring comfortable and efficient pumping. However, we’re all unique and no two nipples point in the same direction, so good alignment is a very personal thing.
Before aligning your nipple, it’s important to check you’re using the right breast shield size (see ‘How to choose your breast shield size’).
How to decide which intensity setting to use
Elvie Stride 2 has 10 different intensity settings, which means you can tailor the pump to be just right for you.
When you select a higher intensity, two things happen:
The suction gets stronger.
The pumping cycles get slower.
When you use a lower intensity setting, the opposite happens:
The suction reduces.
The pumping cycles get faster.
While it might seem logical, using a higher setting may not always produce more milk. Some women find that stronger suction is the best thing for their milk output, while others find that faster cycles really get things moving.
It’s best to experiment to find what works for you.
Please keep in mind that pumping beyond a setting that is comfortable for you is likely to have a negative impact on milk production. If suction strength is your thing, always make sure you're within a range that is comfortable.